The Problem: Cables That Move Every Time You Do
You bought a standing desk to improve your posture and productivity. You sit, you stand, you adjust the height throughout the day — and every single time, that bundle of cables hanging beneath the surface swings, snags, or pulls taut against your monitor arm. Your power strip is taped to the underside with a strip of Velcro that’s already peeling. Your USB hub cable snakes across the floor in a loop that you’ve already tripped over twice this week. When the desk is at sit height, cables pool on the floor. When it’s at stand height, the same cables go tight as a guitar string.
You’ve tried a few things: a bag of cable ties that made everything look neat for about a week, a couple of adhesive hooks that lasted until the first warm day, and a zip-up cable sleeve that bunched up every time the desk moved. None of it held up to the height-change cycle. What you need isn’t just a cable organiser — it’s one designed around the fact that your desk moves, and ideally one that costs less than £30 so you’re not gambling a lot of money on something that might not work for your specific setup.
This guide cuts through the noise and tells you exactly which type of solution to buy depending on your desk, your cable count, and whether you want a truly tool-free install or don’t mind drilling two screws.
How We Evaluated These Picks
The research behind this guide drew on buyer review patterns across hundreds of verified purchases, product specifications, and the specific demands of height-adjustable standing desks — which create unique stresses that static desks don’t. Key criteria included: mounting method compatibility with common desk thicknesses (18mm–28mm is the norm for most sit-stand desks), load capacity relative to a typical cable bundle, how well each solution handles repeated vertical movement without loosening or drooping, ease of repositioning when you rearrange your setup, and value relative to the sub-£30 price ceiling. Where possible, common failure points flagged in negative reviews (adhesive failure, flimsy clips, too-narrow channels) were used to disqualify weak options or note meaningful caveats.
Quick Picks at a Glance
| Best For | Price Range | Key Feature |
|---|---|---|
| Overall tidy underdesk setup | £14–£20 | No-drill clamp-mount cable tray holds power strip + cables out of sight |
| Budget starter (clips only) | Under £8 | Adhesive cable clips for routing individual wires along desk legs |
| Hiding a moving cable run | £8–£14 | Flexible cable sleeve or split loom for the vertical drop zone |
| Desk leg cable routing | £6–£12 | Cable raceway channel with adhesive backing, paintable surface |
| Velcro-based reusable ties | Under £6 | Hook-and-loop cable ties, reusable, no residue |
| Combination tray + cable clips kit | £18–£28 | Under-desk mesh tray plus integrated side clips, single install |
| Cord organiser box for power strips | £12–£22 | Enclosed box hides the entire power strip and excess cord lengths |
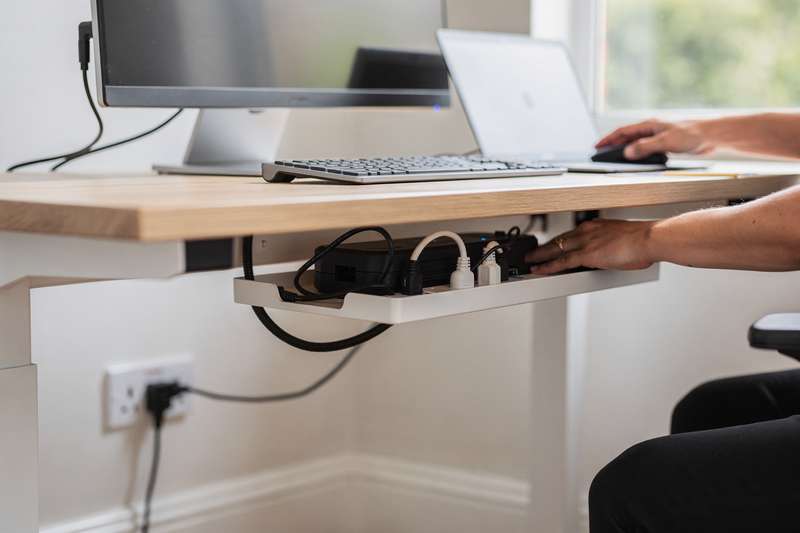
Best Overall: No-Drill Clamp-Mount Under-Desk Cable Tray
If your standing desk has a standard rectangular top between 18mm and 28mm thick — which describes the overwhelming majority of sit-stand frames from brands like Flexispot, Ikea Bekant, and Autonomous — a clamp-mount cable tray is the most satisfying single purchase you can make. It attaches to the underside of your desk using two or four clamps that tighten with a bolt, meaning no holes, no adhesive, no screws into the desktop surface. You slide the tray into position, tighten the bolts, and drop your power strip inside. Done in under ten minutes.
Look for a tray with a steel or powder-coated steel mesh construction rather than plastic. Plastic trays flex under load and the clips can crack over time as the desk vibrates during height adjustment. A mesh basket around 38–50cm long is wide enough to hold a standard 4- or 6-socket UK power strip plus the excess cabling that usually spills off the back. Check the stated weight capacity — anything rated to at least 3kg is realistic for a power strip, a USB hub, and a coil of spare cable.
The clamp mechanism is the detail to scrutinise. Some cheaper trays use a single central clamp that lets the tray pivot and sag over weeks. Better designs use two independent clamps positioned at each end of the tray, which distributes load evenly and prevents rotational sag. When the desk travels between sitting and standing heights, the tray stays fixed relative to the desktop and the cables inside simply hang in the basket — no snagging, no swinging. The result is that when you look under the desk, you see one clean mesh container rather than a tangle of independent cables.
The main limitation: clamp trays add 8–12cm of depth beneath the desk surface, so if you’re working in a tight space or have a shallow knee clearance, check your measurements before buying. Also, some trays sold as “no-drill” still require you to feed a bolt through a drilled hole in the clamp bracket — read the installation description carefully if your desktop material is a composite or has a hollow honeycomb core (common in cheaper desks) where clamp pressure can cause surface denting.
Best Budget Starter: Adhesive Cable Clips for Individual Wire Routing
Sometimes the problem isn’t a chaotic cable tray — it’s four individual cables running from the desktop down to the floor, each taking a slightly different route and tangling whenever the desk height changes. Adhesive cable clips solve this specific problem at minimal cost, typically £5–£8 for a pack of 20–30 clips in mixed sizes.
The key to making adhesive clips work on a standing desk is placement strategy. Don’t stick them to the desk frame’s moving parts or the legs themselves if your desk has a telescoping design — the vibration and movement will eventually fatigue the adhesive bond. Instead, use them on the underside of the static desktop surface to guide cables toward the back edge, and then at the top of the leg where the cable transitions into the vertical drop. From there, you want the vertical section of cable to have enough slack to accommodate the full height range of your desk without going taut at the top. A good rule of thumb: measure the difference between your desk’s minimum and maximum height, add 20%, and that’s how much slack to leave in the vertical cable run.
Look for clips with a rotating cable guide rather than a fixed slot. Fixed-slot clips lock the cable at one angle, and if the cable exits at a slight angle as the desk moves, it levers the adhesive pad off the surface over a few weeks. Rotating or hinged clips flex with slight cable movement and dramatically outlast fixed-slot designs. The adhesive base should be rated for the surface you’re sticking to — painted MDF, powder-coated steel, and glass all behave differently. Most cable clips use 3M VHB-style pads; if yours don’t, buy a roll of 3M Command Strip adhesive tabs separately and swap them in for significantly better longevity.
The honest tradeoff: adhesive clips alone won’t tidy a chaotic setup with six or more cables. They’re a routing tool, not a concealment tool. Use them in conjunction with a cable sleeve or tray for a complete solution, rather than expecting them to do everything on their own.
Best for the Vertical Drop: Flexible Cable Sleeve or Split Loom
The most vulnerable part of any standing desk cable setup is the section that travels vertically between the desktop and the floor. Every time the desk moves, this section stretches and bunches. A flexible cable sleeve — essentially a woven neoprene or nylon tube that you zip or snap shut around a bundle of cables — turns five or six individual wires into one neat vertical column that moves gracefully with the desk.
There are two main types: zip-up woven sleeves and split-loom plastic tubing. Woven sleeves look cleaner, handle more cables, and are easier to add or remove cables from after installation. Split-loom tubing is stiffer, cheaper, and better if you only have two or three cables to manage, but it kinks awkwardly on standing desks when the height range is large. For sit-stand desks with a height range of 70cm or more, a woven sleeve is the better choice — it coils and uncoils naturally rather than fighting the movement.
Measure the length of sleeve you need carefully. You want it to run from just below the desktop surface down to roughly 10–15cm above floor level, and you want enough extra length coiled at the bottom to accommodate the full extension of the desk. A sleeve that’s too short will pull taut; one that’s too long will look messy. For a desk with a 65–120cm height range, a sleeve of around 180cm gives you enough to work with once you factor in coiling slack at the bottom.
Diameter matters too. Most woven sleeves come in 20mm, 25mm, or 32mm internal diameter. A 20mm sleeve handles three or four standard cables comfortably; for five or more (power, two display cables, USB hub, headset), step up to 25mm or 32mm. Cramming too many cables into an undersized sleeve defeats the purpose — it makes the sleeve stiff and difficult to manage, and the cables inside can develop kinks at stress points.
One genuine limitation: woven sleeves don’t work well if your cables have connectors larger than the sleeve opening (some DisplayPort or power brick connectors are chunky). In that case, you thread individual cables through before attaching connectors, which is awkward on an existing setup. Split loom avoids this by snapping open along one side.
Best for a Clean Desk Leg: Adhesive Cable Raceway Channel
If you want the tidiest possible visual finish — particularly important if your desk is in a visible part of a room — an adhesive cable raceway channel along the inside face of your desk leg gives a near-professional result without a single drill. These are rectangular plastic channels, usually white or black, that press onto a surface using a pre-applied adhesive strip. You run your cables inside the channel and clip the lid shut.
The critical spec is internal channel size. For a standing desk where you’re routing power, video, and USB cables together, you need a channel with an internal cross-section of at least 25mm × 16mm. Smaller channels are marketed as universal but genuinely struggle with anything thicker than a phone charger cable. The D-Line and similar UK-available brands typically offer their channels in 20mm, 25mm, and 40mm widths — the 25mm D2 size handles most desktop cable scenarios without forcing cables to bunch or create pressure points.
For standing desks, avoid adhering the raceway to the moving portion of the telescoping leg. Fix it to the static outer leg section only, then transition to a cable sleeve or generous cable coil for the section that travels with the desk. This hybrid approach — raceway on the static leg, sleeve for the dynamic drop — gives you a clean look from the side and functional flexibility for the moving section.
The adhesive on many raceways is adequate on powder-coated steel legs but marginal on smooth aluminium or plastic legs. Supplement with small dabs of exterior-grade adhesive at the joints if you find the strip lifting after a few weeks. Also note that most raceways are not paintable despite being marketed as such — the adhesive layer prevents proper paint adhesion, so pick a colour that matches your desk out of the box.
Best Reusable Tie Option: Hook-and-Loop Cable Ties
Reusable hook-and-loop (Velcro-style) cable ties are the least glamorous item in this guide and also one of the most genuinely useful. They cost almost nothing — a pack of 50 ties in various widths runs under £6 — and unlike zip ties, you can adjust, remove, or add cables without cutting anything. On a standing desk where your setup evolves over time, that reusability matters.
Use them in two ways. First, as bundle ties: group the cables running under the desk into two or three logical bundles (power cables together, data cables together, display cables together) and tie each bundle at 20–30cm intervals. This stops individual cables from separating and swinging during height changes. Second, use wider Velcro straps to secure cable bundles to the underside of the desk or to the cable tray, acting as a retention strap rather than a loop tie.
Look for ties with a fabric backing rather than pure hook-and-loop on both faces — the fabric-backed versions grip cables without scratching the cable jacket, and they hold tension better under repeated use. Width matters: 13mm ties are fine for individual cables; for bundles of four or more cables, a 20mm or 25mm tie holds more securely without cutting into the bundle. Avoid the very cheapest packs where the hook side is rough enough to snag on clothing or soft cable jackets.
The limitation is obvious: cable ties don’t route or conceal anything on their own. They’re a supplementary tool. But used as part of a complete system — tray underneath, sleeve for the vertical drop, ties to keep bundles neat inside the tray — they transform a messy tangle into something properly organised at almost no cost.
Best All-in-One Kit: Under-Desk Mesh Tray with Integrated Cable Clips
For anyone who’d rather buy one thing and be done with it, some under-desk trays now come packaged with a set of adhesive cable clips, Velcro ties, and occasionally a short cable sleeve included in the box. These combination kits sit in the £18–£28 range and represent reasonable value compared to buying the components separately.
When evaluating a kit, the tray itself is still the most important element — apply the same mesh vs. plastic, clamp type, and weight capacity checks described in the first pick above. The bundled clips and ties are typically basic quality and are best thought of as a starter set; you’ll probably buy better clips separately once you see what the kit’s clips are like in practice. The real value of the kit format is that everything is sized to work together — the clips have the right diameter for the same cable gauge that the tray is sized for, and the sleeve is pre-cut to a length that works with the tray position.
One thing to verify before buying: some kits marketed as “cable management systems” are essentially just a plastic box with a slot in the back, designed for a static desk, not a sit-stand frame. Look for the phrase “suitable for standing desks” or “height-adjustable desk compatible” in the product description, and double-check that the clamp mechanism fits your specific desktop thickness. Most kits accommodate 10mm–28mm, but some narrower clamps won’t grip the thicker composite tops found on heavier-duty desks.
The tradeoff with kits is flexibility. If you already have a power strip and your cable situation is moderately complex, you may find the tray too short or the included accessories the wrong size. In that case, building your own combination from individual components (tray + clips + sleeve bought separately) gives you better results at a similar or slightly higher total cost, with everything selected to precisely match your setup.
Best for Hiding the Power Strip: Enclosed Cable Management Box
If your power strip sits on the floor or on the desk surface and you find the combination of brick-shaped adapter plugs, extension cord loops, and dangling tails genuinely distracting, an enclosed cable management box is the solution. These are rigid plastic or fabric-covered boxes with openings at each end for cables to exit, sized to contain a standard 4- or 6-socket UK power strip and a reasonable length of mains cable.
For a standing desk specifically, the box is most useful when mounted to the underside of the desktop (some include underside clamps or Velcro mount strips) rather than sitting on the floor. If it’s floor-mounted, every height adjustment leaves the box stationary while the cables above it stretch — not a problem as long as you’ve left enough slack, but floor-mounted boxes gather dust and are easy to kick. An underside-mounted box keeps the power strip static relative to the desk and travels with it, which is genuinely cleaner in practice.
Look for a box with ventilation openings. Power strips and adaptors generate some heat, and an airtight box around a loaded power strip is a minor fire risk. Any reputable cable box will have louvered ventilation built into the top and sides; if you see a plain sealed design, skip it. Also check the internal dimensions against your actual power strip — UK 6-socket strips with surge protection are typically around 30–35cm long, and many “standard” cable boxes only accommodate 28cm.
The honest downside: a cable box doesn’t manage cables beyond what’s inside it. The cables exiting either end still need to be routed and tidied by other means. Think of it as the last piece of a complete system rather than a standalone fix.
What to Look for When Buying a Cable Organiser for a Standing Desk
- Mounting method and desk compatibility: Clamp mounts are the most reliable for sit-stand desks; always verify the clamp’s jaw range against your desktop thickness before ordering. Adhesive-only solutions are riskier on desks that vibrate during height adjustment.
- Weight and load capacity: A full UK power strip with six plugged-in adapters can weigh 1.5–2.5kg. Add cables and you need a tray rated to at least 3kg. Plastic trays rarely publish a weight rating — treat that as a red flag.
- Accommodation for height travel: Any organiser that attaches cables to both the desk and the floor will go taut when the desk rises. Your cable management system should keep all cable routing relative to the desk, with only a flexible sleeve or coiled slack connecting down to the floor.
- Cable count and diameter: Count your cables before buying. A standing desk workstation realistically has 5–10 cables (power strip lead, monitor power × 1–2, display cable × 1–2, USB hub, laptop charger, audio). Make sure whatever you buy can handle that volume without cramming.
- Reusability and adjustability: Your setup will change. Avoid solutions that are permanently fixed (like drilled plastic raceways through the desktop) in favour of clamps, Velcro, and removable clips that you can reposition when you add or remove equipment.
- Material quality: For anything bearing load, steel mesh beats plastic. For adhesive clips, look for 3M-compatible or pre-applied 3M VHB pads. For cable sleeves, woven neoprene or braided nylon outlasts PVC split loom on a moving desk.
- Aesthetics and finish: If your desk is visible in video calls or a shared office, the colour and tidiness of the solution matters. Matte black and matte white finishes are broadly neutral; brushed steel suits aluminium-frame desks. Avoid glossy finishes that show fingerprints and scuffs quickly.
Comparison Table
| Solution Type | Price Range | Mounting Method | Load / Cable Capacity | Sit-Stand Suitability | Reusable / Adjustable |
|---|---|---|---|---|---|
| No-drill clamp-mount cable tray | £14–£20 | Desk-edge clamp | High (3kg+, full power strip) | Excellent — moves with desk | Yes — reposition easily |
| Adhesive cable clips | £5–£8 | Adhesive pad | Low (individual cables) | Good with correct placement | Partial — removal damages adhesive |
| Flexible woven cable sleeve | £8–£14 | None — wraps around cables | Medium (4–8 cables in one run) | Excellent — designed for movement | Yes — zip/snap open anytime |
| Adhesive cable raceway channel | £6–£12 | Adhesive strip on static surface | Medium (depends on channel size) | Good on static leg sections only | Partial — channel lids clip on/off |
| Hook-and-loop cable ties | Under £6 | Wraps around cables/frame | Supplementary only | Excellent — fully flexible | Yes — fully reusable |
| Under-desk tray + clips kit | £18–£28 | Clamp or screw | High (full power strip + cables) | Very good — check clamp spec | Yes — tray stays, clips adjustable |
| Enclosed cable management box | £12–£22 | Velcro/clamp to underside | High (full power strip inside) | Good when desk-mounted, not floor-mounted | Yes — removable lid for access |
Verdict
For most people with a standing desk and a typical 5–8 cable setup, the right approach is a combination of two things rather than one: a no-drill clamp-mount mesh tray to hold your power strip and cable surplus under the desktop, paired with a flexible woven sleeve for the vertical cable drop to the floor. Together, these two items will cost you £20–£32 — just at the edge of the £30 budget if you shop carefully, or comfortably within it if you prioritise the tray and use cable ties for the vertical section.
If budget is the primary constraint and you want one thing under £10, start with a woven cable sleeve for the vertical drop and a pack of hook-and-loop ties. It won’t conceal everything, but it will stop the snagging and swinging that’s the most annoying part of standing desk cable management — and you can add the tray when it’s convenient.
Avoid relying solely on adhesive solutions on a sit-stand desk. The vibration and repeated movement will defeat most adhesive products within weeks, especially in a warm room. Mechanical fixings — clamps, tension bolts, Velcro straps — hold far more reliably over the long term and are worth the minor extra effort at install time.
Editorial Note
This guide was not commissioned by or produced in partnership with any manufacturer or retailer. All opinions are independent and based on publicly available specifications, verified buyer feedback patterns, and category research. Prices shown are indicative ranges accurate at time of writing and may vary.
FAQ
Can I use a standard cable tray on a standing desk, or do I need a specialist one?
Most standard under-desk cable trays will work fine on a standing desk as long as they use a clamp mount rather than relying on adhesive or screws into the desktop. The tray moves with the desk and your cables stay contained. The main check is that the clamp’s jaw range fits your desktop thickness — measure before buying.
How much cable slack should I leave for the vertical drop on a sit-stand desk?
Calculate the difference between your desk’s minimum and maximum height, then add at least 20–25% on top of that figure. For a desk that travels between 65cm and 125cm, that’s a 60cm height range, so you want around 75cm of slack in the vertical cable run. Route this as a coil at the bottom when the desk is at standing height.
Will adhesive cable clips stay stuck on a powder-coated steel desk frame?
Adhesive performance on powder-coated steel varies by product. Clips using 3M VHB-style pads perform well on clean, degreased surfaces. Wipe the area with isopropyl alcohol before applying, hold the clip firmly for 30 seconds, and leave 24 hours before loading it. Even so, avoid sticking clips to the moving/telescoping sections of the desk leg, as vibration and lateral movement will fatigue the bond over time.
Is it safe to put a power strip inside an enclosed cable management box?
Yes, provided the box has adequate ventilation (louvered openings on the top and sides) and you don’t exceed the power strip’s rated load. An airtight box around a heavily loaded power strip can cause heat build-up, so always check for ventilation before buying. If your power strip has a built-in surge protector, make sure the indicator light is still visible or accessible so you can see if it trips.
What’s the best way to manage cables on a standing desk in a small flat where the desk is visible in video calls?
Prioritise a black or desk-matched colour scheme and invest in a woven cable sleeve for the vertical drop — it looks far neater than bare cables on camera. An under-desk cable tray keeps the power strip out of the shot entirely. Finish with a raceway channel on the static outer leg if the leg is visible; it gives a built-in appearance at low cost.
Do cable sleeves work if my cables have large connectors already attached?
Zip-up woven sleeves usually have a zip that runs the full length, so you can open them, lay cables inside, and close — large connectors aren’t a barrier. Split-loom plastic tubing also snaps open along one side for the same reason. The one type to avoid if you have chunky connectors is a drawstring sleeve where cables must be threaded through from one end; those require you to disconnect and reconnect everything.