You Just Want to Stop Paying £4 a Bottle
You’ve been picking up bottles of kombucha from the chiller aisle for months — sometimes daily — and the cost has quietly crept up to something embarrassing. You’ve read enough about home brewing to know it’s genuinely doable, but every time you search for a kit, you end up with either a US-focused review that lists products you can’t find on Amazon UK, or a Reddit thread that assumes you already know what a SCOBY hotel is. You don’t. You just want to make your own fizzy, probiotic tea without turning your kitchen into a science lab.
The specific problem most first-timers hit isn’t the brewing itself — it’s buying the wrong vessel. Too small and you’re bottling every three days; too complex and the kit sits in a cupboard. Then there’s the spigot question: plastic, stainless steel, or a dispensing valve? Does the jar come with a cloth cover, or do you improvise with a rubber band and a square of muslin? This guide answers all of that, based on a thorough look at what’s actually available on Amazon UK and what real buyers report after six months of use.
How We Evaluated These Kits
Every kit in this guide was assessed against the same six criteria: vessel capacity relative to a typical household’s weekly consumption; material quality of the jar and spigot (glass thickness, food-grade certifications, and corrosion resistance); the completeness of accessories included out of the box; the clarity and usefulness of any instructions or educational materials; the range and reliability of monitoring tools such as pH strips and temperature indicators; and — critically for beginners — how easy the spigot or dispensing mechanism is to use without spilling half your batch. We also examined patterns in verified buyer reviews, paying particular attention to reports of spigot leaks, glass breakage during shipping, and how kits perform after six or more months of continuous use, not just the first brew.
Quick Picks at a Glance
| Best for | Price range | Key feature |
|---|---|---|
| Complete beginners who want hand-holding | £30–£50 | Full kit with expert instructions, pH strips, and temperature gauge |
| Budget-conscious first-timers | Under £30 | 1-gallon glass jar with stainless steel spigot and monitoring basics |
| Kitchen aesthetics and tidy countertops | £25–£40 | Hexagonal glass jar with built-in dispensing valve and volume markers |
| Households that want to run two batches at once | £35–£55 | Two-jar set with temperature strips and cloth covers |
| Brewers ready to scale up from day one | £35–£55 | 1.5-gallon jar with stainless steel spigot, integrated filter, and funnel |
| Detail-oriented brewers who log every batch | £30–£45 | 1-gallon jar with built-in notes area and full accessory set |
Best for Complete Beginners: The Education-First 1-Gallon Kit
If you’ve never brewed kombucha before and you’re genuinely uncertain whether you’ll get it right, the most useful thing a kit can give you isn’t a fancy jar — it’s confidence. Look for a 1-gallon kit built around a thick-walled American-style glass fermenter paired with high-quality pH test strips and a temperature gauge, and — most importantly — unusually thorough instructions written by people who actually brew. The best versions of this kit include post-brewing guidance as well, so you know what to do once you’ve made your first batch and you’re staring at a slightly vinegary liquid wondering if it’s supposed to smell like that.
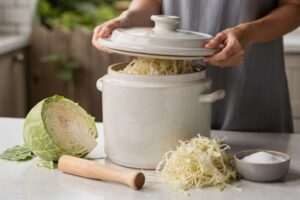
The jar itself should be the priority. A thick glass vessel resists thermal shock when you pour hot sweet tea into it, and a wide mouth makes cleaning and SCOBY maintenance much less fiddly. The stainless steel or BPA-free plastic spigot on the better kits in this category tends to be well-fitted from the factory, which matters because a loose spigot on a 1-gallon jar full of kombucha is a sticky, wasteful mess. Expect to pay in the £30–£50 range for a genuinely complete package.
Where this type of kit earns its premium over cheaper alternatives is in the documentation. Generic kits often include a folded A5 sheet with eight steps and a generic warning about mould. The better education-first kits include multi-page brewing guides, troubleshooting sections, and sometimes access to online support — which, as a first-timer, you will almost certainly want at least once. The tradeoff is that you’re paying partly for content rather than hardware, so if you’re already confident in fermentation basics, you could save money by choosing a plainer vessel and sourcing instructions online.
What to avoid in this category: kits that list “SCOBY included” without clarifying whether it’s a live culture or a dehydrated pellicle. Live SCOBYs and starter tea combined give you the fastest, most reliable first ferment; dehydrated cultures need rehydrating and can take two to three weeks longer to produce a reliably acidic brew. Check the product description carefully before buying.
Best Budget Pick: The No-Frills 1-Gallon Stainless Steel Spigot Kit
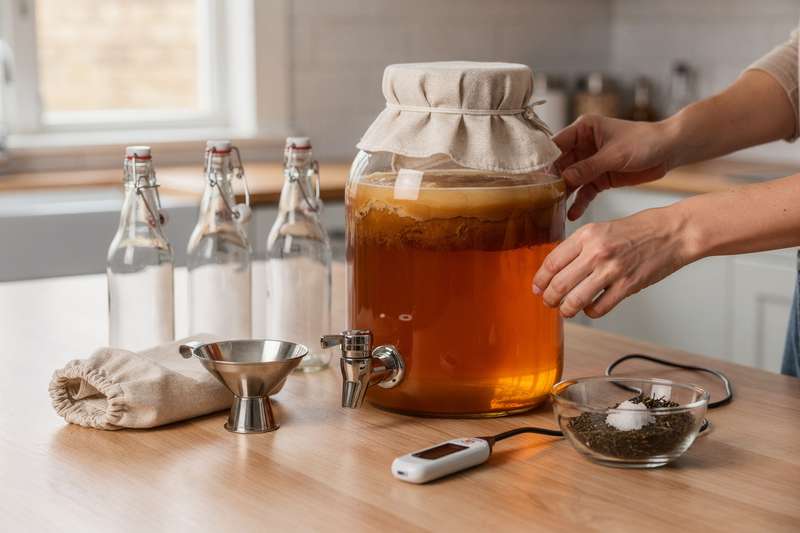
Continuous fermentation doesn’t require spending £50 upfront, especially when you’re not yet sure whether home brewing will become a regular habit. A solid budget entry in this category gives you a 1-gallon glass fermenting jar, a stainless steel spigot, a cloth cover with a rubber band or elastic rim, and the basics you need to get started. Some include a small measuring cup, a thermometer strip, and pH test papers — not the most precise monitoring tools available, but entirely workable for a first-timer trying to learn the process before upgrading.
The stainless steel spigot is the detail worth paying attention to here. In the sub-£30 segment you’ll encounter kits with plastic spigots that are technically food-safe but prone to staining from the tannins in black tea and from the acidic kombucha itself. Stainless steel holds up much better over repeated use, resists the kind of mineral build-up that can harbour bacteria in a plastic valve, and is generally easier to unscrew and clean when you do a full vessel washdown between batches. If a kit at this price point offers stainless steel hardware rather than plastic, that’s a meaningful quality indicator.
A thoughtful extra found on some budget kits is a small notes area moulded or printed onto the side of the jar — somewhere to mark the brew date, the tea type, or the sugar ratio. It sounds minor, but when you’re running your third or fourth batch and trying to remember what you changed last time, having that reference directly on the vessel is genuinely useful. Some brewers stick masking tape labels on the outside; others use a whiteboard marker on glass. Either works, but a dedicated notes area is a nice touch at any price.
The honest tradeoff at the budget end is that the monitoring tools are basic. Adhesive temperature strips give you a rough range rather than a precise reading, and paper pH strips require a bit of interpretive skill — the colour match isn’t always obvious under kitchen lighting. These limitations won’t ruin your kombucha, but they do mean you’ll be making more educated guesses than data-driven decisions. For a first batch or two, that’s fine. If you find yourself getting serious about brewing, upgrading to a digital thermometer and more precise pH strips is a worthwhile next step, and it costs less than £15.
Best for Kitchen Aesthetics: The Hexagonal Valve Jar
Most fermenting vessels are functional but not particularly attractive — a round glass jar with a metal spigot is practical, but it’s not something you’d put front and centre on the counter as a conversation piece. The hexagonal honeycomb-inspired jar is a genuine exception. Its geometric shape, embossed bee logo, and clear glass construction look intentional rather than utilitarian, which matters if your kitchen counter is a considered space rather than a fermentation corner tucked behind the bread bin.
The key functional feature to understand here is the dispensing valve, which differs from a standard spigot in its mechanism. A spigot is a tap-style valve — you rotate or push a lever to open flow. A dispensing valve uses a push-button or press-down mechanism, typically with a spring-loaded seal. Both serve the same purpose: controlled pouring without lifting the vessel. The dispensing valve on hexagonal jars in this category tends to produce a slightly faster, more direct pour, which is convenient for bottling day. The tradeoff is that dispensing valves made from plastic components can be marginally harder to disassemble fully for deep cleaning compared to a simple screw-out stainless steel spigot. If regular thorough cleaning is a priority — and it should be — confirm the valve disassembles into cleanable parts before buying.
The volume markers embossed into the glass are a detail that earns genuine appreciation from first-timers. Knowing where your 1-gallon brew line sits without needing to measure separately removes one small friction point from the process, and the 2-cup starter line is useful when you’re calibrating your sweet tea batch or reserving starter liquid for the next ferment. These markers aren’t a reason to choose this jar over others, but they’re a sign that the design has been thought through from a practical brewing perspective.
Price-wise, expect to pay a modest premium over the plainest budget jars — typically in the £25–£40 range depending on the retailer. The jar is sold as a standalone vessel rather than a complete kit, which means you’ll need to source your SCOBY, starter tea, cloth cover, and monitoring tools separately. Factor that into your budget comparison with the all-in-one kits listed elsewhere in this guide.
Best for Running Two Batches: The Twin-Jar Set
Once you’ve brewed kombucha even once, you’ll immediately understand the appeal of having two vessels on the go simultaneously. The logic is simple: while one jar is in its primary fermentation phase (typically seven to fourteen days), the other can be emptied, cleaned, and set up with a fresh batch. This staggered approach means you always have kombucha ready to bottle, and you’re never in the slightly frustrating position of having finished your last bottle while the current batch needs another four days.
Two-jar sets typically include a pair of 1-gallon wide-mouth glass jars, two plastic spigots, a set of adhesive temperature strips, and two elastic or drawstring cloth covers. The wide-mouth design is worth highlighting: it makes removing and reinserting a SCOBY — which can grow to the full diameter of the jar over several batches — significantly easier than wrestling it out through a narrow neck. If you’re committed to continuous brewing from the start, the wide mouth is a feature to prioritise regardless of which kit you choose.
The honest consideration with twin-jar sets is the spigot material. At the price point where two-jar sets typically land (£35–£55), you’re more likely to find plastic rather than stainless steel spigots. Plastic is workable, and the spigots in better sets are BPA-free and rated for food contact, but they do stain over time. Some buyers in this category report minor leaking from the spigot seal after several months — if this happens, a replacement washer or a light wrap of plumber’s PTFE tape usually solves it immediately. Keep that in mind as a simple maintenance step rather than a dealbreaker.
Six adhesive temperature strips shared across two jars means each jar gets three strips, which is enough to give you a rough read of the ambient fermentation temperature from different angles on the vessel. Pair these with a reliable room thermometer placed near your brewing spot and you’ll have a good practical picture of the environment your SCOBY is working in. The sweet spot for most kombucha fermentation is 24–29°C — warmer than the average UK kitchen in winter, which means many first-timers end up placing their jars near a radiator or on top of a fridge where warmth rises. Test your spots with a thermometer before committing a full batch.
Best for Scaling Up: The 1.5-Gallon Kit with Integrated Filter
If your household gets through kombucha quickly — or if you’re planning to experiment with flavoured second fermentation in multiple small bottles — starting with a 1.5-gallon vessel makes practical sense. The difference between a 1-gallon and a 1.5-gallon batch isn’t just about volume; it also gives your SCOBY more surface area to grow, which in turn makes the fermentation process more robust and forgiving of minor temperature or timing variations. For a household of two or more daily kombucha drinkers, the 1.5-gallon format is often the right long-term choice.
The stainless steel spigot with an integrated mesh filter is the standout functional feature in this category. The filter catches yeast strands and SCOBY fragments as kombucha flows through the spigot, which means your bottled kombucha is cleaner and clearer from the outset. Without a filter, you’ll frequently find brown stringy sediment in your bottles — harmless, but off-putting, and it means more sediment management at the second fermentation stage. The integrated approach keeps the filter permanently in place rather than requiring you to hold a separate strainer over a funnel while you pour with one hand.
A separate funnel with additional filters — included in the better kits in this format — is a useful addition when you’re moving kombucha from the primary vessel into individual 500ml or 750ml swing-top bottles for second fermentation. The funnel makes an otherwise slightly awkward pour into a narrow bottle mouth much neater, and the additional filters catch anything the spigot filter missed. It’s a small accessory that saves a surprising amount of mess on bottling day.
The pH strip and adhesive temperature strip included are the same basic monitoring tools you’ll find across most kits in this guide. They’re functional rather than precise. If you find yourself brewing seriously at this scale, a calibrated digital pH meter (available for around £15–£25 on Amazon UK) is worth adding to your toolkit, particularly when you’re adjusting recipes and trying to understand how different tea types or sugar quantities affect the final acidity and flavour profile. For a first few batches, the strip-based tools are sufficient.
Best for Detail-Oriented Brewers: The Notes-Panel 1-Gallon Kit
Consistency is what separates a brewer who occasionally makes good kombucha from one who makes good kombucha reliably. The single biggest obstacle to consistency is the failure to record what you actually did — the tea type, the steeping time, the sugar quantity, the fermentation temperature, the number of days before it tasted right. Most first-timers start out intending to remember all of this and end up three batches in with no reliable record of what made batch two so much better than batch one.
A kit that includes a dedicated notes area directly on the vessel addresses this in the simplest possible way. Whether it’s an etched panel on the glass, a whiteboard-style coating on one face of the jar, or a moulded recess designed for a label insert, the principle is the same: your batch information travels with the vessel rather than being scribbled in a notebook you’ll lose or typed into a notes app you won’t find again. It sounds like a small thing, but experienced home brewers consistently cite record-keeping as the single habit that most improved their results.
The full accessory set that accompanies the better versions of this kit — stainless steel spigot, mesh filter, lid, 250ml measuring cup, thermometer, pH test papers, cloth cover, and cup brush — is genuinely complete. You could order this kit and start brewing the same week without needing to source any additional components other than your SCOBY and starter tea (which aren’t included in any kit covered in this guide, as shipping live cultures is subject to postal and import restrictions).
The stainless steel spigot with an integrated filter on this kit is worth comparing directly with the 1.5-gallon version above. The mechanisms are similar — a screw-out body with a mesh filter insert — but the 1-gallon format is easier to lift and clean, and the smaller vessel reaches fermentation temperature faster in a cooler kitchen. If space is limited and your household drinks one to two litres per week, the 1-gallon with this accessory set is better calibrated to your actual consumption than a larger vessel you’ll struggle to empty before the next batch is ready.
What to Look For When Buying a Continuous Brew Kombucha Kit
- Vessel capacity matched to your household: A 1-gallon jar produces roughly 3.5–3.8 litres of finished kombucha per batch. If two people each drink 250ml a day, that’s roughly a week’s supply — a good match for continuous brewing at a seven-to-ten day cycle. Larger households, or those who like second fermentation in multiple flavours, should consider 1.5 gallons or two separate 1-gallon vessels.
- Spigot material and cleanability: Stainless steel spigots last longer, resist staining, and are more straightforward to fully disassemble for cleaning. Plastic spigots are lighter and often cheaper but can harbour residue in threads and seals over time. Whichever you choose, confirm the spigot unscrews completely so you can clean inside the body — a spigot that can’t be dismantled is a hygiene concern in long-term continuous brewing.
- Dispensing mechanism vs. standard spigot: A push-button dispensing valve and a lever-style spigot both control flow; they differ mainly in pour speed and disassembly ease. If bottling speed on a busy day matters to you, a dispensing valve is convenient. If thorough cleanability matters more, a simple stainless steel screw-out spigot is easier to inspect and replace.
- Glass quality and mouth width: Thick-walled glass resists thermal shock when you add hot sweet tea, and a wide mouth (at least 100mm diameter) makes SCOBY removal, cleaning, and refilling far less frustrating than a narrow-neck jar. Check the product listing for stated glass thickness if it’s listed — anything described as “thick” or “heavy” is generally preferable to no stated specification.
- Monitoring tools included: pH strips and adhesive temperature strips are the minimum useful monitoring set. Paper pH strips in the 2.5–7.0 range are what you need for kombucha (finished kombucha typically reads between 2.5 and 3.5). If only a basic temperature strip is included, add a simple room thermometer to your setup — knowing your ambient temperature helps you predict fermentation speed reliably.
- SCOBY and starter tea: No kit in this guide includes a live SCOBY — and that’s normal for UK-sold kits, as shipping live cultures is complicated. Source your SCOBY from a local homebrew shop, a UK-based fermentation supplier, or a trusted online seller who ships in insulated packaging with a health guarantee. Don’t use a dehydrated SCOBY from an unknown source for your first batch; the failure rate is higher and the timeline is much longer.
- Replacement parts availability: A kit that sells replacement spigots, washers, and filters separately through the same Amazon listing or seller is worth choosing over one where the hardware appears unavailable after the initial purchase. Spigot washers are the most commonly replaced part — they cost pennies but can’t be improvised easily.
Comparison Table
| Kit type | Capacity | Spigot material | Filter included | Monitoring tools | Notable feature |
|---|---|---|---|---|---|
| Education-first 1-gallon | 1 gallon (~3.8L) | Stainless steel | Yes (mesh) | pH strips, temperature gauge | Expert instructions and post-brew support materials |
| Budget 1-gallon with SS spigot | 1 gallon (~3.8L) | Stainless steel | Yes (mesh) | Thermometer strip, pH test papers | Built-in notes area on vessel; full accessory set |
| Hexagonal dispensing-valve jar | 1 gallon (~3.8L) | Plastic dispensing valve (push-button mechanism) | No (open spout) | Volume markers on glass | Geometric honeycomb design; embossed brew-line markers |
| Twin 1-gallon jar set | 2 × 1 gallon (~7.6L total) | Plastic | No | 6 adhesive temperature strips | Staggered-batch flexibility; wide-mouth design |
| 1.5-gallon with integrated filter | 1.5 gallon (~5.7L) | Stainless steel with integrated mesh filter | Yes (integrated + funnel filters) | pH strip, temperature strip | Larger capacity; funnel with extra filters for bottling |
| Notes-panel 1-gallon full kit | 1 gallon (~3.8L) | Stainless steel | Yes (mesh) | Thermometer, pH test papers | Dedicated notes area on vessel; 250ml measuring cup and cup brush included |
Verdict
For most first-timers in the UK, the education-first 1-gallon kit is the clearest recommendation. The combination of a thick glass vessel, a reliable stainless steel spigot, proper pH and temperature monitoring, and — most importantly — genuinely useful brewing guidance gives you the best chance of a successful first batch without needing to supplement the kit with external resources. Home brewing kombucha has a modest but real learning curve, and having well-written instructions that anticipate your questions is worth paying a small premium for.
If you’re confident enough to figure things out as you go, or if you already brew other fermented foods, the notes-panel 1-gallon kit is the stronger purely functional choice at a lower price point — it has the same core hardware, the useful batch-logging feature, and a complete accessory set. The twin-jar set is the pick for anyone who drinks kombucha daily and wants a continuous, uninterrupted supply from the first month of brewing. The 1.5-gallon option is worth choosing if your household is larger than two, or if you’re already certain that regular home brewing is something you’ll commit to long-term.
Editorial Note
This guide was produced independently. No manufacturer or seller paid for inclusion or influenced the editorial assessment. All opinions are based on publicly available specifications, verified buyer feedback patterns, and category research conducted for choizio.com. Prices shown are indicative at the time of writing and may have changed.
FAQ
Do I need a SCOBY before I buy a kit?
Yes — no UK continuous brewing kit ships with a live SCOBY due to postal restrictions on biological cultures. Source yours from a UK fermentation supplier, a local homebrew shop, or a trusted seller who ships with a temperature guarantee. A healthy live SCOBY with a cup of starter liquid will give you a working first batch in seven to fourteen days depending on your kitchen temperature.
What is continuous fermentation and how does it differ from batch brewing?
In continuous fermentation, you leave the SCOBY permanently in the vessel and draw off a portion of finished kombucha through the spigot every few days, then top the vessel back up with fresh sweet tea. Batch brewing involves emptying the jar completely between each cycle. Continuous fermentation is faster because the SCOBY is already active and conditioned, the pH drops more quickly from the residual acidic liquid, and you get a more consistent flavour across batches once you’ve dialled in your recipe.
How do I know when my kombucha is ready to bottle?
Taste is your most reliable indicator — finished kombucha should be pleasantly tart with a faint vinegary edge but not so sharp it’s unpalatable. Backing this up with a pH strip reading of around 2.5–3.5 confirms it’s acidified enough to be safe and shelf-stable. The time this takes varies from five days in a warm kitchen (around 26–28°C) to two weeks or more in a cooler environment.
Can I use any tea, or does it have to be black tea?
Black tea is the safest choice for your first several batches because it provides the tannins and nitrogen that SCOBYs thrive on. Once your SCOBY is established and robust — typically after three or four successful batches — you can experiment with green tea, white tea, or blended options. Avoid flavoured teas with essential oils (Earl Grey, for example) in the primary ferment, as these can stress or damage the culture.
Why does my kombucha have brown stringy bits in it?
Those strands are yeast — a completely normal byproduct of fermentation and not a sign that anything has gone wrong. They’re harmless to drink. If you find the appearance off-putting, pouring your kombucha through a fine mesh filter or choosing a kit with an integrated spigot filter will catch most of them before bottling. Chilling your finished kombucha also causes some yeast to settle to the bottom of the bottle.
How do I clean the spigot properly between batches?
Unscrew the spigot body completely and disassemble it into its component parts — at minimum the outer body, the valve shaft, and the rubber or silicone washer. Rinse each part under hot water, then soak for ten minutes in a solution of white vinegar and water (1:4 ratio) to break down any mineral or yeast build-up. Rinse thoroughly with cold water before reassembling. Do this every two to three batches at minimum, and inspect the washer for cracking or deformation each time you clean it.